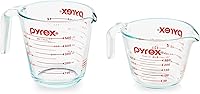
Which Measuring Cup Sizes Do You Need?
Most kitchens need 1/4, 1/3, 1/2 and 1 cup dry measures, plus a 1- or 2-cup liquid cup. Add 3/4 cup for recipes that use it often, and choose larger liquid cups for batters, sauces and batch cooking.
On this page (9 sections)
- Which measuring cup sizes should a kitchen have?
- What is a cup measure for liquid ingredients?
- Do measuring cups and sizes change for baking?
- When is a 3-piece liquid measuring cup set useful?
- Are stainless steel cups better for dry ingredients?
- How should you choose measuring cup sizes for small batches?
- How do you use measuring cups accurately?
- What measuring cup sizes do you need for bread baking?
- Measuring cups sizes chart: which set fits you?
The measuring cup sizes most kitchens need are 1/4, 1/3, 1/2 and 1 cup for dry ingredients, plus a 1- or 2-cup liquid measure. That core group covers most cakes, muffins, cookies and everyday cooking without forcing you to combine smaller measures again and again.
Add 3/4 cup when your recipes use it often, and choose a larger liquid cup for sauces, batters or batch cooking. A 1-cup liquid measure suits small drinks and single servings, while a 2-cup size gives better headroom for batter and soup.
Cup measures show volume, so they help you follow recipes written in cups. They do not replace a scale when a recipe gives ingredients by weight, especially for flour.
Think in terms of frequency rather than owning every size possible. If 3/4 cup appears in your favorite recipes week after week, a dedicated measure saves time.
If it appears once in a while, combining 1/2 cup and 1/4 cup works fine.
Storage matters too. A tidy core set is easier to keep in one drawer than a large collection that rarely gets used.
Start with the sizes you reach for most, then add only what your cooking proves you need.
For liquid ingredients, match the cup to the amount you usually pour. That prevents spills, awkward refills and markings that are hard to read near the rim.
Use dry cups for dry ingredients and a liquid cup for pourable ingredients. Keeping those roles separate helps you level properly and pour cleanly.
Over time, that simple setup handles most recipes a home kitchen makes. You can expand later for large batches or specialist baking, but the core sizes will remain the ones you use daily.
Which measuring cup sizes should a kitchen have?
A basic set of four dry sizes covers most baking and cooking tasks. The 1-cup measure handles common portions, while the smaller sizes help you measure without repeated combinations.
| Size | Common use |
|---|---|
| 1/4 cup | Small amounts of flour, sugar, oats or chopped ingredients |
| 1/3 cup | Smaller recipe portions and ingredients such as oil or cocoa |
| 1/2 cup | Common amounts of flour, sugar, butter or grains |
| 3/4 cup | Recipes that use this amount regularly |
| 1 cup | Larger portions of dry ingredients |
A 3/4-cup measure is not required if you already have 1/2- and 1/4-cup sizes. You can combine those two for 3/4 cup in a pinch, and many occasional bakers will find that perfectly acceptable.
It becomes worthwhile when you bake often, work quickly, or want fewer scoops in a recipe. If several favorites call for 3/4 cup of sugar, oats or flour, one dedicated cup cuts down on filling, leveling and washing an extra measure.
Consider also how you store the set. A 3/4-cup cup can sit in a drawer with the core sizes without adding much bulk.
That makes it an easy add-on for regular bakers.
For cooks who make bread, cakes or muffins every week, the time saved adds up. It also lowers the chance of miscounting when you are juggling multiple ingredients.
For a broader overview of materials, shapes and uses, see our measuring cups guide.
Look at your recipe pile before you decide. Mark how many recipes use 3/4 cup compared with the core sizes.
If the number is high, buy the extra cup. If it is low, combinations will serve you well.
Either way, the core set remains the foundation. Add 3/4 cup only when it will genuinely speed up the work you do most.
What is a cup measure for liquid ingredients?
A liquid measuring cup is best for water, milk, oil, broth and other pourable ingredients. Its markings show volume, while the spout and headroom help you pour without filling to the rim.
Choose a 1-cup liquid measure for small recipes and everyday drinks. It is light in the hand and fits where larger cups do not, and its markings are spaced for small amounts.
A 2-cup measure gives more room for cake batter, soup ingredients and larger mixtures without several fills. The extra space also helps when you whisk or add ingredients directly in the cup.
A 4-cup liquid measure can help with larger batches, but it takes more storage space. Measure the shelf or drawer before choosing a large size.
Think about your usual tasks. Tea, coffee, a single sauce or a small pancake batch rarely needs more than 1 cup.
Cake batter, stock for soup or a family size drink benefits from 2 cups or more.
Headroom matters for accuracy as well as pouring. When liquid sits well below the rim, you can move the cup to the bowl without sloshing over the edge.
Read the markings carefully before you pour. Fill the cup on a flat surface, add liquid slowly, and check the line at eye level, or from above if the cup has angled markings.
A non-slip grip helps when hands are wet from washing or handling ingredients. It gives steadier control as you lift and tilt the cup toward the bowl.
Clean the cup promptly after use and rinse away milk, oil or batter before it dries. Keeping the outside dry makes the lines easier to see next time.
For most kitchens, a 1-cup or 2-cup liquid measure covers daily use. Choose the larger size only if your batches regularly fill the smaller one to the top.
Do measuring cups and sizes change for baking?
Measuring cups and sizes don't change, but the measuring method changes by ingredient. Flour, brown sugar, oats and chopped ingredients can settle or pack differently, so the same cup volume may contain different weights.
For flour, spoon it into a dry cup and level the top unless the recipe gives another method. Avoid dipping deeply into a flour container if you want to limit packing.
Brown sugar is often pressed into the cup when the recipe says packed. Granulated sugar usually goes into the cup and is leveled.
Follow the recipe's wording instead of treating every dry ingredient the same.
For bread-machine recipes, consistent flour measurement matters because small differences affect dough hydration. Our guide on how to measure flour for a bread machine explains the basic method, and our bread-maker ingredient measuring guide covers the wider workflow.
When is a 3-piece liquid measuring cup set useful?
A 3-piece liquid set is useful when you regularly measure small, medium and large liquid amounts. Having 1-cup, 2-cup and 4-cup sizes means you can choose a vessel that gives enough room without using the largest cup for every task.
The OXO Good Grips Angled Measuring Cups set includes 1-cup, 2-cup and 4-cup sizes. Each cup has angled markings for reading from above, cup, ounce and milliliter markings, and a non-slip grip.
That angled design changes the daily routine in a practical way. Instead of bending down or lifting the cup to eye level, you fill it on the counter and look down into it.
The three sizes suit different moments in the same recipe. The 1-cup works for a splash of vanilla, a little oil or a small drink.
The 2-cup handles batter, broth and dressings, while the 4-cup covers stock, soup and batch cocktails without repeated refills.
The cups are BPA-free Tritan Renew plastic, which contains 50% certified recycled content through a mass balance allocation process. The plastic body keeps the cups lightweight.
A non-slip grip supports your hold when hands are wet. It helps you pour steadily from the generous spout, which is useful when the cup is fairly full and the liquid is hot or thick.
Storage is the main trade-off. Three cups take more room than a single measure, so check your drawer or cupboard before you commit, and choose a single 2-cup cup if space is tight.
Care is simple because the cups are top-rack dishwasher safe. Wash them promptly and dry them well so the markings stay easy to read.
This set suits cooks who move between small and large amounts often. If you mainly measure the same amount every day, one size may be enough, but the range here removes a lot of compromise.
This set suits a kitchen where one cup is often too small and four cups is sometimes more convenient. It needs more storage space than a single liquid measure, but the three sizes cover a wider range of tasks.
Are stainless steel cups better for dry ingredients?
Stainless steel dry cups are a practical choice when you want rigid cups, permanent markings and separate sizes for scooping and leveling. They are especially useful for flour, sugar, grains and other ingredients that go into a bowl by volume.
The OXO Good Grips 4 Piece Stainless Steel set includes 1/4-cup, 1/3-cup, 1/2-cup and 1-cup measures. Its etched markings are permanent, and the magnetic handles keep the cups together while allowing one cup to be removed at a time.
The set suits bakers who want the core dry increments in one group. It doesn't include a 3/4-cup measure or a liquid measuring cup, so you may still need another tool for those jobs.
For a closer look at dry-cup shapes and materials, compare our best dry measuring cups for bakers.
How should you choose measuring cup sizes for small batches?
Choose small measuring cup sizes when you often make half batches, single servings or recipes with small liquid amounts. A 1-cup liquid measure is usually easier to store and handle than a larger vessel for these jobs.
Small dry cups also help when a recipe calls for 1/4 or 1/3 cup. They reduce the need to fill and level a larger cup repeatedly, which can be useful when several ingredients use different small amounts.
For half batches, small sizes keep the workflow calm. You can measure 1/4 cup of sugar, 1/3 cup of flour and 1/2 cup of oats without filling a 1-cup measure and then trying to judge a partial amount.
Small liquid cups help with similar tasks. A 1-cup measure makes it easier to read 1/4 cup or 1/2 cup of milk or oil, because the markings are not crowded near the bottom of a tall vessel.
Handling is another reason to choose small sizes. A compact cup is lighter, easier to grip and simpler to pour into a small bowl.
Storage favors small sizes as well. They nest or stack more easily in a small drawer, and they leave room for spoons and other tools.
Our best small measuring cups guide focuses on compact options. If you want one tool that adjusts across amounts, compare adjustable measuring cups and spoons.
Adjustable tools can be handy, but dedicated small cups often feel simpler for pouring and leveling. You fill, level or read, then move on without setting a slider or checking a moving part.
When a recipe scales down, check the proportions before you measure. Halving 3/4 cup gives 3/8 cup, which is harder to measure, so consider rounding or choosing a different recipe size when the math gets awkward.
Small cups also help you keep ingredients separate. Measuring each dry ingredient in its own cup before adding it to the bowl reduces the risk of confusion when several amounts are close together.
Care for small cups is straightforward. Rinse or wash them soon after use, dry them fully, and store them where the markings will not rub against other tools.
If your cooking is mostly small batches, prioritize 1/4, 1/3 and 1/2 cup dry measures plus a 1-cup liquid measure. That group will handle most of your daily work without wasted space.
How do you use measuring cups accurately?
Use dry cups for ingredients you scoop and level, and liquid cups for ingredients you pour. Set the liquid cup on a flat surface, pour to the marking, and check the line at eye level unless angled markings let you read from above.
For dry ingredients, fill the cup without pressing unless the recipe says to pack the ingredient. Sweep a straight edge across the top to remove excess.
Keep the cup stable while filling. Wipe the rim and outside before adding the ingredient to a mixing bowl so extra flour, sugar or liquid doesn't change the recipe.
Measuring cups and measuring spoons serve different amounts. Read our comparison of measuring spoons vs measuring cups when a recipe uses teaspoons, tablespoons and cup measures together.
For common increments, see measuring spoon sizes.
What measuring cup sizes do you need for bread baking?
For bread baking, start with 1-cup, 1/2-cup, 1/3-cup and 1/4-cup dry measures, plus a liquid cup that is large enough for your recipe. A 2-cup liquid measure gives room for water, milk or other liquids without filling to the rim.
Bread recipes often use several dry ingredients in different amounts. A full dry set reduces repeated filling and makes it easier to keep ingredient amounts separate before mixing.
That separation helps with consistency. When flour, salt, yeast and other dry ingredients are measured in their own cups, you can check each amount before anything goes into the bowl, and it is easier to fix a mistake at that stage.
Volume measuring can vary with flour packing, so use a scale when the recipe provides weights. If you use cups, keep your method consistent from one loaf to the next.
Consistency matters because bread dough responds to small changes in hydration. Spooning flour into the cup and leveling it the same way each time gives a more repeatable result than dipping the cup and pressing down.
For liquid, choose a cup with clear markings and enough headroom. Water should sit below the rim so you can carry it to the bowl without spills, and milk or oil needs the same steady handling.
A 2-cup liquid measure also helps when a recipe calls for more than 1 cup of liquid. You can measure in one fill rather than two, which reduces the chance of error and keeps the workflow moving.
Set up your workspace before you start. Place the dry cups, liquid cup, bowls and recipe where you can reach them without moving a full measure across the bench, as that small step prevents spills and mix-ups.
Level dry ingredients with a straight edge. Fill the cup, sweep once across the top, and avoid tapping or pressing unless the recipe asks for packed ingredients.
Wipe the outside of each cup before adding the ingredient to the bowl. A little flour on the rim can fall into the mix and change the amount by more than you expect.
If you use a bread machine, follow its guide for ingredient order and liquid temperature. Accurate measuring still matters, but the machine will do the mixing and kneading once the ingredients are in.
Keep notes on what works for your kitchen. If a loaf is consistently dry or wet, adjust the method or the liquid amount in small steps rather than changing everything at once.
With the core dry sizes and a sturdy liquid cup, you have what most bread recipes need. Add tools later only if a particular style of bread asks for them.
Measuring cups sizes chart: which set fits you?
Use this measuring cup sizes chart as a quick decision guide:
| Your main task | Sizes to prioritize |
|---|---|
| Everyday baking | 1/4, 1/3, 1/2 and 1 cup dry sizes |
| Recipes with frequent 3/4-cup amounts | The core dry set plus 3/4 cup |
| Sauces, drinks and small batters | 1-cup liquid measure |
| Larger batters and cooking tasks | 2-cup liquid measure |
| Large liquid batches | 1-cup, 2-cup and 4-cup liquid set |
| Bread-machine recipes | Core dry sizes plus a liquid measure |
| Small portions and limited storage | 1/4, 1/3 and 1/2 cup, plus a 1-cup liquid measure |
The best choice is the set that matches your recipes and storage space. Pick the 4-piece stainless steel set for core dry sizes, the 2-cup angled cup for everyday liquids, or the 3-piece angled set when you need several liquid capacities.
If you often use 3/4 cup, add that size rather than relying on repeated combinations. If you mostly measure flour and sugar, prioritize dry cups and use a separate liquid cup for water, milk and oil.
For everyday baking, the core dry sizes of 1/4, 1/3, 1/2 and 1 cup will cover most recipes. Stainless steel cups suit scooping and leveling, and etched markings stay readable over time.
For sauces, drinks and small batters, a 1-cup liquid measure is compact and easy to handle. It stores well and gives clear readings for small amounts.
For larger batters and cooking tasks, a 2-cup liquid measure adds headroom without becoming unwieldy. It is a practical middle ground for many kitchens.
For large liquid batches, a 1-cup, 2-cup and 4-cup liquid set covers the widest range. It costs more in storage space, but it removes the need to refill or guess on big jobs.
For bread-machine recipes, combine the core dry sizes with a liquid measure that fits your usual liquid amount. Consistency in measuring matters more than owning a specialist tool.
For small portions and limited storage, choose 1/4, 1/3 and 1/2 cup dry measures plus a 1-cup liquid measure. That compact group handles half batches and single servings with ease.
Before you buy, check your drawers and shelves. A set that fits where you store it will get used more often than a larger set kept in an awkward place.
Also check your most used recipes. The sizes that appear again and again should decide your purchase, not the longest list of sizes.
Start with the set that fits your daily cooking, then add only what is missing. That approach keeps the kitchen tidy and the measuring simple.
Keep the core set as your foundation and expand only for tasks you repeat. That keeps storage tidy and buying focused on what you actually use.
Frequently asked questions
What measuring cup sizes do I need?
Most kitchens need 1/4, 1/3, 1/2 and 1 cup dry measuring cups, plus a 1- or 2-cup liquid measuring cup. Add a 3/4-cup measure if your recipes use that amount often, or choose a 3-piece liquid set when you regularly work with larger quantities.
Is a 3/4-cup measuring cup necessary?
A 3/4-cup measuring cup is useful but not essential. You can measure 3/4 cup with a 1/2-cup and 1/4-cup measure, but a dedicated 3/4-cup size saves a step when recipes use it often.
It can also reduce repeated scooping during baking.
What is a cup measure for liquids?
A liquid cup measure shows volume for ingredients such as water, milk and oil. In US recipes, 1 cup equals 8 fluid ounces, but the cup is a volume measure, not a weight measure.
Use the markings at eye level unless the cup has angled markings designed for viewing from above.
Do measuring cups and sizes work for flour and sugar?
Dry measuring cups work for flour, sugar, oats and similar ingredients when the recipe uses volume. For better consistency, fill the cup as directed and level the top.
A kitchen scale is often more precise for flour because packing changes the amount in a cup.
What is the difference between dry and liquid measuring cups?
Dry measuring cups are filled to the top and leveled, while liquid measuring cups leave room below the rim so you can pour without spilling. Liquid cups usually have a spout and volume markings.
Use the type that matches the ingredient and the measuring method in the recipe.