How to Use a Banneton Proofing Basket?
On this page (6 sections)
Using a banneton proofing basket is simple and helps your bread achieve a beautiful, crispy crust and classic shape. You’ll get the best results by properly preparing and using your banneton for the final rise. It’s a baker’s best friend for artisan loaves.
A banneton, also called a proofing basket or brotform, is a tool that shapes and supports dough during its final fermentation. Many bakers find it essential for creating professional-looking sourdough and other yeasted breads. You’ll notice a big difference in your loaf’s appearance and texture.
- Coat your banneton with flour to prevent sticking.
- Gently place your shaped dough into the basket.
- Allow dough to rise in the banneton.
- Invert the basket to transfer dough to your baking surface.
Ready to get that gorgeous, bakery-worthy loaf? Let’s walk through exactly how to use a banneton step by step.
Getting Started with Your Banneton Basket
Using a banneton is a fantastic way to bring that professional touch to your homemade bread. These baskets are designed to give your dough structure and a beautiful shape as it proofs. Let’s get you set up for success with your first loaf.
Choosing the Right Banneton
Bannetons come in various shapes and sizes. You’ll find round ones (also called “brotform”) and oval ones. The size you choose often depends on the type and quantity of bread you bake most often. A common size is the 9-inch round, which is great for standard boule-shaped loaves. If you bake longer, narrower loaves, an oval banneton might be a better fit. Some bakers even use multiple bannetons for different bread styles. Don’t worry too much about picking the absolute perfect one to start; most standard sizes will work wonderfully for most home bakers.
Preparing Your Banneton for Use
This is a really important step for preventing your dough from sticking. Your banneton needs a good coating of flour before you use it. This coating acts as a barrier between the dough and the basket’s fibers.
The Flour Coating: What and How Much
Many bakers prefer using rice flour for this. Rice flour is gluten-free and doesn’t absorb moisture as readily as wheat flour. This means it’s less likely to get sticky and gum up the basket. You can also use a mix of rice flour and all-purpose flour, or just all-purpose flour if that’s what you have on hand. The key is to get a nice, even layer everywhere.
Applying the Flour: A Step-by-Step Guide
Here’s how to get that perfect flour coating:
- Generously sprinkle flour all over the inside of the banneton.
- Use your hand or a small brush to work the flour into the grooves and all around the surface.
- Turn the banneton upside down over a sink or bowl and tap it firmly to knock out any excess flour.
- You want a light, powdery coating, not a thick paste. A little bit of flour stuck to the sides is fine; it’s the loose, excess flour you want to remove.
If your banneton is brand new, it’s a good idea to give it a thorough coating the first few times you use it. This helps to build up a natural non-stick surface over time. Some people even oil their banneton lightly before flouring for extra insurance against sticking. However, for most standard baskets, a good dusting of rice flour is usually sufficient.
Using Your Banneton for the Final Rise
Once your banneton is prepped, it’s time to let your dough have its second, and final, rise. This is where the magic happens to create that beautiful crust and shape.
Shaping Your Dough
Before placing your dough in the banneton, you need to shape it. This process gently tightens the surface of the dough. It creates a smooth, taut skin that will hold its shape. You want to do this without deflating the air bubbles that have developed during fermentation. Gently fold the dough onto itself, creating surface tension. The goal is a round or oval shape that will fit snugly into your basket.
Placing Dough into the Banneton
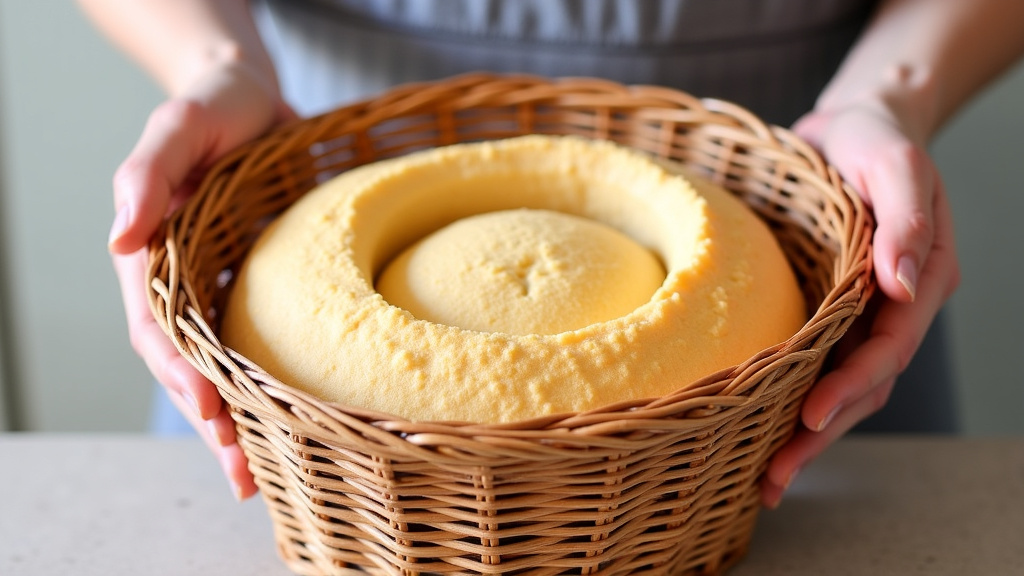
This is a delicate operation. You want to transfer the shaped dough smoothly. Lift the dough carefully and invert it directly into your floured banneton. The seam side of the dough should be facing upwards in the basket. This way, when you turn the basket out to bake, the smooth side will be on top.
Take your time here. If the dough sticks a little, a gentle wiggle might help. Sometimes, a bench scraper can be useful to help lift and guide the dough. Avoid pulling or tearing the dough. A gentle hand is key to preserving that lovely airy structure.
The Final Proofing Period
Once the dough is nestled in the banneton, cover it. This prevents the surface from drying out. Plastic wrap, a clean kitchen towel, or a plastic bag can work well. Place the covered banneton in a warm spot to complete its final rise. The exact time will depend on your recipe and the room temperature. You’re looking for the dough to become puffy and nearly doubled in size. A gentle poke should leave an indentation that slowly springs back.
How to Tell When Your Dough is Ready
This can be tricky for beginners. A good test is the “poke test.” Gently poke the side of the dough with a floured finger. If the indentation springs back quickly, it needs more time. If it springs back slowly, leaving a slight indent, it’s likely ready. If the indentation stays completely, the dough might be over-proofed.
Many bakers also rely on visual cues. The dough should look visibly larger and feel airy. For sourdough, you might see some small bubbles on the surface. Research from baking science journals suggests that optimal proofing leads to the best oven spring (Mayo Clinic). Getting this timing right comes with practice and observing how your dough behaves in your specific environment. Understanding optimal proofing is key to achieving the best oven spring and texture in your loaves.
Baking Day: Removing Dough from the Banneton
The moment of truth! Removing the dough from the banneton is usually straightforward if you’ve prepped it well.
The Inversion Technique
Place your baking surface (like a parchment-lined baking sheet or a preheated Dutch oven) directly on top of the banneton. Then, with one quick, confident motion, flip the whole thing over. The banneton should come away clean, leaving your beautifully shaped dough on your baking surface. The seam side will now be on the bottom, and the smooth, perfectly formed loaf will be ready for the oven.
Troubleshooting Sticking Issues
If the dough doesn’t release easily, don’t panic! It’s usually a simple fix. You can try gently coaxing the edges with a thin offset spatula or a butter knife. Sometimes, a little extra flour applied with a brush can help loosen it. If it’s really stuck, you might have an over-hydrated dough or insufficient flour in the banneton. For your next bake, ensure a generous coating of rice flour and consider a slightly shorter proofing time if you suspect over-proofing.
Transferring to Your Baking Vessel
Once the dough is out of the banneton, you can score it if your recipe calls for it. This allows the bread to expand in a controlled way during baking. Then, carefully transfer it to your preheated oven. The shape you achieved in the banneton will be maintained as it bakes, giving you that classic, professional look.
Caring for Your Banneton
Proper care will ensure your banneton lasts for many bakes. Think of it as an investment in your bread-making journey.
Cleaning Your Banneton
This is perhaps the most misunderstood part of banneton care. You generally do not wash your banneton with soap and water. Doing so can damage the natural fibers and make it prone to mold. Instead, after each use, turn the basket upside down and tap out any loose flour and dough bits.
For more stubborn bits, a stiff brush can help. You can also use a damp cloth to wipe down the surface, but make sure it dries completely afterward. Many bakers find that a good dusting of flour over time builds up a natural non-stick surface that only improves with use.
Drying and Storing Your Banneton
It’s essential to ensure your banneton is completely dry before storing it. Moisture can lead to mold. Store it in a dry, well-ventilated area. Some people store theirs on a shelf, while others hang them up. Avoid storing it in a humid environment like a damp cupboard or a plastic bag, as this can trap moisture.
If you notice any signs of mold, you can try to clean it with a stiff brush and ensure it dries thoroughly in the sun or a low oven. However, severe mold might mean it’s time to replace the banneton. Following these simple cleaning and storage tips will help maintain its shape and function for years to come.
Quick Banneton Checklist for Your Next Bake
Here’s a quick rundown to keep in mind:
- Flour it Well: Generously coat the inside with rice flour or your preferred flour.
- Shape Gently: Tighten your dough without deflating it.
- Smooth Transfer: Invert the dough into the basket, seam-side up.
- Cover and Rest: Prevent drying and allow the final rise.
- Flip with Confidence: Invert onto your baking surface for a clean release.
- Brush and Dry: Clean and ensure it’s completely dry before storing.
Conclusion
You’ve now learned the essentials of using your banneton proofing basket. It’s a straightforward tool that makes a big difference in your bread’s final look and texture. Remember to always flour your basket well and handle your dough gently. Proper care ensures your banneton will be a reliable baking companion for years. Your next bake is the perfect opportunity to put these steps into practice and enjoy that beautiful, crusty loaf you’ve been dreaming of!
Frequently Asked Questions
How do I clean my banneton basket after using it?
Generally, you should never wash your banneton with soap and water. Just tap out excess flour and dough bits after each use. A stiff brush can help remove stubborn crumbs. Always ensure it’s completely dry before storing.
What is the best type of flour to use for coating a banneton?
Many bakers prefer using rice flour because it’s gluten-free and less likely to stick. A mix of rice and all-purpose flour also works well. The goal is a light, even coating to prevent dough from adhering to the basket’s fibers.
Can I use a banneton for dough that isn’t sourdough?
Absolutely! Bannetons are excellent for any yeasted bread dough, not just sourdough. They provide structure and shape for loaves like baguettes, ciabattas, and other artisan breads during their final rise.
What if my dough sticks to the banneton?
Don’t worry; it’s a common issue. Ensure you’ve used a generous amount of flour, especially rice flour, in the basket. Gently coaxing the edges with a thin spatula can help. Next time, try a bit more flour or a slightly shorter proofing time.
How long should I let my dough proof in the banneton?
Proofing time varies based on your recipe, yeast activity, and room temperature. Your dough is ready when it’s puffy and has nearly doubled in size. A gentle poke should leave an indentation that slowly springs back.