
Why Does My Bread Machine Bread Have Large Holes?

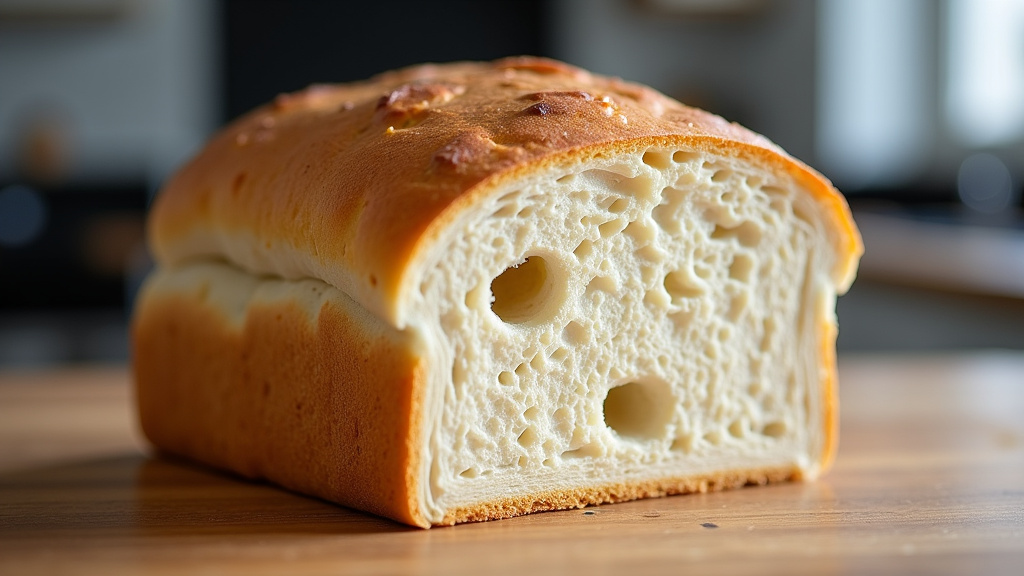
Your bread machine bread has large holes mainly because the yeast is too active or the liquid temperature was too high. This causes the dough to rise too quickly and create big air pockets. We found that a happy medium in yeast and water temperature is key for a good loaf. It’s a common baking puzzle many home bakers face.
When your bread machine’s efforts result in a loaf with an open, holey crumb, it often points to a few specific factors. Understanding these can help you achieve that perfectly even texture you’re hoping for. Many bakers notice this when they’ve made small changes to their usual recipe, like using a different brand of flour or a slightly warmer kitchen.
- Yeast activity level is a major player.
- Water temperature can make or break your rise.
- Too much rising time can lead to large holes.
- Ingredients not mixed well can also cause issues.
Let’s walk through exactly why your bread machine might be creating these large tunnels and how you can get that classic, even crumb.
Troubleshooting Those Big Holes in Your Bread Machine Loaf
It’s a common puzzle for bread machine bakers: you’ve followed the recipe, loaded everything in, and pressed start, only to find your finished loaf has giant air pockets. These large holes, sometimes called tunnels or an open crumb, can make your bread a bit messy to slice and spread. But don’t worry, you’re not alone in this! Many of us have stared at a loaf and wondered, “What happened?”
The good news is that this issue is usually a sign that something with the dough’s fermentation process went a little too fast or too wild. Your bread machine is designed to do all the work, but sometimes the environment or ingredients can throw it off balance. We’ve looked into why this happens and how you can easily fix it.
The Science Behind Bread’s Air Bubbles
Bread’s airy texture comes from a tiny organism: yeast. When yeast eats the sugars in flour, it releases carbon dioxide gas. This gas gets trapped in the gluten network of the dough, creating bubbles. The goal is to have these bubbles form a nice, even texture throughout your loaf. When holes get too big, it means those bubbles grew too quickly or merged together.
Think of it like a balloon. If you blow it up slowly and steadily, you get a nice, round shape. If you try to inflate it super fast, it might stretch too thin in places or even pop. Dough is similar; it needs a controlled rise to develop a good crumb structure. Your bread machine aims for this control, but a few key factors can influence its success.
Yeast: The Little Engine That Could (Too Much!)
Yeast is the star player in bread making. It’s responsible for making your dough rise and giving bread its characteristic flavor. However, just like any good engine, it can sometimes be a bit too enthusiastic.
Is Your Yeast Too Active?
One of the biggest culprits behind large holes is overactive yeast. This can happen for a few reasons. If your yeast is very fresh and potent, it will produce more gas, faster. If your kitchen is warmer than usual, yeast also becomes more active.
When yeast goes into overdrive, it creates gas bubbles much faster than the gluten network can stretch to hold them. These bubbles expand rapidly, grow large, and can merge into bigger pockets. This results in those big, irregular holes you’re seeing. We found that using slightly less yeast or ensuring it’s not past its prime can make a big difference.
Checking Your Yeast’s Freshness
Old yeast might not be active enough, leading to a dense loaf. But very fresh, super-potent yeast can cause the opposite problem! Always check the expiration date on your yeast package. If it’s close to the date or you’re unsure, it’s best to use fresh yeast.
You can test your yeast, too. Mix a small amount of yeast with a little warm water (around 105-115°F or 40-46°C) and a pinch of sugar. Let it sit for about 5-10 minutes. If it gets foamy and bubbly, it’s active and ready to go. If not, it’s time for a new packet (CDC).
The Impact of Water Temperature
Water temperature is another critical element. It directly affects how quickly your yeast becomes active. Too cool, and your bread might not rise well. Too warm, and you risk scorching the yeast or making it overly hyperactive.
The Sweet Spot for Yeast Activation
Most bread machine recipes call for lukewarm water. For yeast, the ideal temperature range is typically between 105°F and 115°F (40°C to 46°C). This is warm enough to wake up the yeast and get it working efficiently without killing it or making it go wild.
If your tap water is too hot, or if you add boiling water without letting it cool sufficiently, you can easily exceed this optimal range. This can shock the yeast into a frenzy, leading to that rapid gas production and the subsequent large holes. Many bakers find that using a thermometer is helpful, especially when starting out (King Arthur Baking).
Why Too-Hot Water is a Problem
Temperatures above 130°F (54°C) can start to kill yeast. If it’s even hotter, you’re essentially steam-cooking the yeast before it even has a chance to do its job properly, or you’re causing it to produce gas much too quickly. This leads to a rapid, uncontrolled rise that creates those massive air pockets. It’s like trying to boil water and expecting delicate bread to form – it just doesn’t work!
We recommend letting your water sit for a few minutes after heating if you don’t have a thermometer. You should be able to hold your finger in it comfortably for a few seconds. It should feel pleasantly warm, not hot.
Dough Consistency and Mixing Issues
Beyond yeast and temperature, the actual consistency of your dough and how well it’s mixed plays a role. If ingredients aren’t properly incorporated, it can create uneven pockets.
The Role of Gluten Development
Your bread machine kneads the dough to develop gluten. Gluten is the protein network that traps the carbon dioxide gas produced by the yeast. If the dough isn’t kneaded enough, or if ingredients aren’t mixed well, the gluten network won’t be strong or even enough to hold the gas. This can lead to weak spots where large bubbles form.
Conversely, if the dough becomes too wet, it can be hard for the gluten to form properly. A dough that is too dry might not stretch enough to hold the gas. We’ve found that paying attention to the dough’s consistency during the kneading cycle is really helpful. It should form a smooth, elastic ball.
Ingredient Order Matters
While bread machines are pretty forgiving, the order in which you add ingredients can sometimes influence how well they incorporate. Many recipes suggest adding liquids first, followed by dry ingredients, and then yeast on top. This keeps the yeast from coming into contact with water too early.
If your yeast gets wet too soon, especially with warm water, it can start its action before the machine even begins kneading. This premature activity can lead to an uneven rise and larger holes. Always double-check your machine’s manual for recommended ingredient order.
The Rise Time and Its Consequences
Bread machines have pre-programmed cycles that include rising times. If something in the process causes the dough to rise too quickly, the machine might not have reached the end of its programmed rise time, but the dough is already over-proofed and ready to bake.
What Happens During a Rapid Rise
A rapid rise means the yeast is working overtime. The carbon dioxide bubbles inflate quickly. Without enough time for the gluten to properly strengthen and stretch, these bubbles can easily grow too large and merge. When the oven time starts, these big pockets get set in place.
This is often linked back to the yeast activity and water temperature. If they’re too high, the dough will simply rise faster than the cycle is designed for. Think of it like letting a cake batter sit out on a hot day – it starts to expand before it even hits the oven.
Checking Your Dough During the Cycle
Some bread machines allow you to peek during the first rise. If you see the dough looking overly puffy and airy very early on, it might be a sign of too much activity. You generally don’t need to intervene, but it helps you understand what’s happening. The machine will bake it as is, resulting in those large holes.
Troubleshooting Checklist for a Better Crumb
If you’re consistently getting loaves with large holes, try implementing these quick checks. They can help you get that perfectly even texture you’re aiming for.
- Check Yeast Freshness: Ensure your yeast is within its expiration date.
- Test Water Temperature: Aim for lukewarm, around 105-115°F (40-46°C).
- Measure Accurately: Use proper measuring cups and spoons for all ingredients.
- Observe Dough Consistency: Look for a smooth, elastic ball during kneading.
- Consider Environment: A very warm kitchen can speed up yeast activity.
- Ingredient Order: Follow your machine’s recommended order for adding ingredients.
Common Recipe Adjustments
Sometimes, a simple tweak to your recipe can solve the large hole problem. If your yeast is very active or your kitchen is warm, you might consider a small adjustment.
Reducing Yeast Slightly
If you suspect your yeast is extra potent, or if you’ve noticed overly rapid rising, try reducing the amount of yeast by about 1/4 teaspoon for a standard loaf. Don’t reduce it too much, though, as you still need enough to make the bread rise properly. This small reduction can often temper the yeast’s enthusiasm just enough (The Kitchn).
Adjusting Liquid Amount
If your dough consistently looks too wet and sticky, you might be adding too much liquid, or your flour might be absorbing less liquid than usual. Try reducing the liquid by a tablespoon. Conversely, if the dough looks very dry and crumbly, add liquid a tablespoon at a time. Getting the hydration right helps the gluten form a strong, even network to trap gases.
The Temperature of Your Flour
Did you know that the temperature of your flour can also play a role? If your flour is stored in a very cold place, like a cool pantry or basement, it can lower the overall temperature of your dough mixture. This might slightly slow down the yeast initially.
How Flour Temperature Affects Dough
Conversely, if your flour is at room temperature and your kitchen is warm, it contributes to the overall warmth of the dough. This warmth encourages faster yeast activity. Many bakers find that bringing flour to room temperature before using it is a good practice for consistent results, but be mindful of how this interacts with your ambient room temperature.
We found that for most standard recipes, room temperature flour is assumed. If you’re baking in the summer with a very warm kitchen, you might notice faster rising times, even with standard flour. In winter, if your flour is straight from a cold garage, the yeast might take a bit longer to get going.
Comparing Different Bread Machine Cycles
Not all cycles on your bread machine are created equal. Some cycles are designed for faster baking, while others allow for longer, slower fermentation, which can lead to better flavor and texture.
Understanding Basic vs. Rapid Bake
A “Rapid Bake” or “Quick Bread” cycle often uses more yeast and a higher initial temperature to speed up the process. While convenient, this can sometimes result in a less controlled rise and thus, larger holes. The rapid activity doesn’t give the gluten enough time to fully develop and stabilize.
If your goal is a classic, even crumb, consider using the machine’s “Basic,” “White,” or “Standard” cycle. These cycles typically allow for more time in both kneading and rising, which leads to a more developed gluten structure and a finer, more even crumb. We found that choosing the right cycle is as important as getting the ingredients right.
Conclusion
You’ve learned that those big holes in your bread machine loaf often come down to yeast activity and water temperature. It’s a delicate balance! When yeast gets too excited or water is too hot, it speeds up the rising process too much. This means the gas bubbles grow too big before the gluten can properly set. By checking your yeast’s freshness, using lukewarm water, and observing your dough, you’re well on your way to a perfect loaf. Keep experimenting with these simple adjustments, and you’ll soon be enjoying that ideal, even crumb you’ve been aiming for!
Frequently Asked Questions
Why does my bread machine bread have a tunnel right down the middle?
A tunnel, or one giant hole, often indicates that the yeast produced gas very rapidly in one area. This can happen if the yeast is extremely active or if the water was too warm. The dough rises so fast that a large pocket forms and stays there.
Is it okay to use less yeast if I’m getting large holes?
Yes, reducing the amount of yeast by a small amount, like 1/4 teaspoon, can help. If your yeast is very fresh or your kitchen is warm, it can be overly active. A slight reduction can temper that activity without preventing a good rise.
My bread machine is always warm inside. Will that make my bread have big holes?
A warm kitchen environment, or a bread machine that runs hot during kneading, can indeed increase yeast activity. This leads to a faster rise and potentially larger air pockets. Try to be mindful of ambient temperature when adding ingredients.
What’s the best water temperature for my bread machine?
Aim for lukewarm water, typically between 105°F and 115°F (40°C to 46°C). This range effectively wakes up the yeast without shocking it or making it overactive. Using a thermometer is the most accurate way to check.
Can the type of flour I use affect the size of the holes?
While less common than yeast or temperature issues, the type and even temperature of your flour can play a minor role. Different flours absorb liquid differently, affecting dough consistency. Also, very cold flour can initially slow down yeast activity.
